How-to turn an Indy into a dedicated webcam

click to enlarge
This old SGI Indy with the marvelous Indycam is laying around my place for ages already. But, in a week where SGI themselves seeks Chapter 11 protection I thought it would be a good idea to get the dust of the Indy and make it into a dedicated little webcamserver, headless, no keyboard attached, just a power button to power it on and off and when it’s running it’ll upload the images automagically to your webserver using sftp.
There will be a follow-up on this how-to, where we will netboot this little beauty to get rid of any SCSI-whine and perhaps we can integrate her into our stereo, as a nice MP3-player(the Indy does have a digital out, kid you not), but for the moment, we’ll first walk through the steps necessary for making it into our little webcamserver.
requirements:
- an Indy with Indycam. These can be had for scratchmoney on eBay and such. I paid 20 euro ($ 30) for mine and that’s already two years ago.
- IRIX installation media, preferably IRIX 5.3 since that comes on one CD and later versions are a. too heavy for early Indies b. they come in +/- 18 CD-sets and installing that is beyond the scope of this How-to. To make it even easier, I found a .torrent for the one installation-CD I used *^_^* (that’s a major coincence, now isn’t it? ;-))
- a SCSI CD-Rom-player, either external or internal. An internal model won’t fit inside the Indy, but on the same cable to which the harddrive is connected, there’s an extra connector to which you can connect an internal model SCSI-CD-Rom-player. Here’s a pic on what that looks like (that’s an IRIX-install I did three years ago)
- a webserver for uploading the images to and sftp/ssh-access to that webserver, we’ll want to show off our 1337 IndyCam-pics now won’t we?
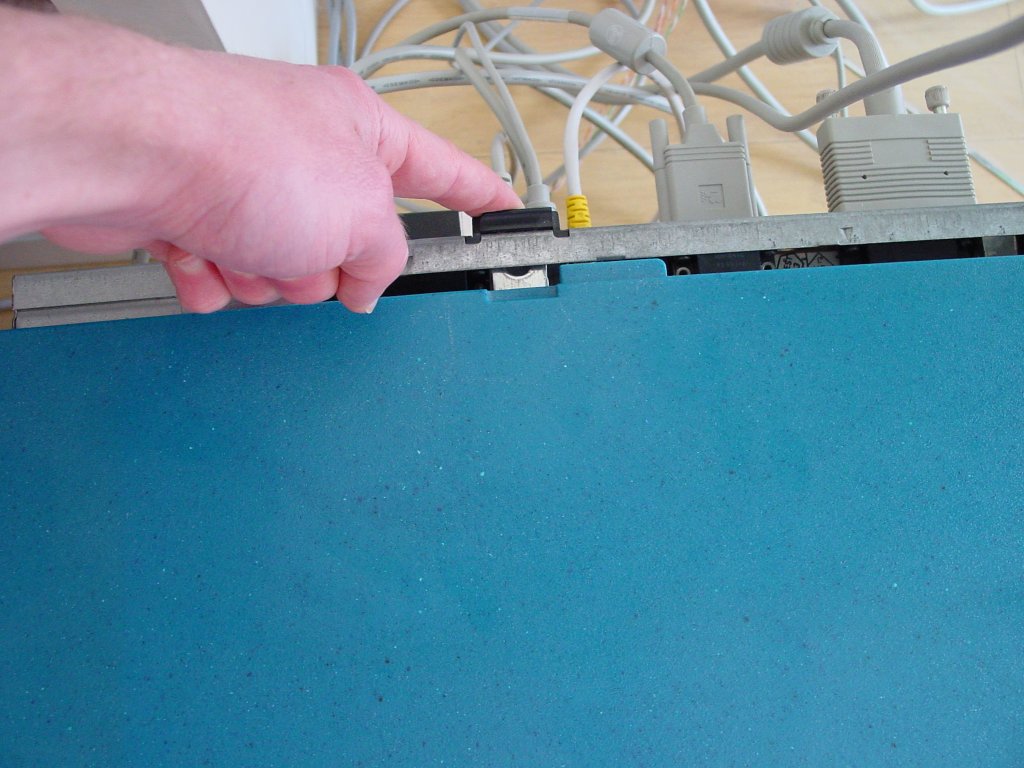
First, it always seems a quest for first-time Indy-owners to discover how to open this baby up, so let’s start with that:

click to enlarge
click to enlarge
click to enlarge
You also need some way to connect it to a monitor. I made my own cable, by using an old VGA-cable and an old 13W3 cable and connect those together and it works brilliant, this is how I did that:
For the pinout-numbers, I used these numbers for the VGA-side of the cable:
http://www.hardwarebook.net/connector/av/vga15.html
and for the 13W3-connector, I used this:
http://www.interfacebus.com/Video_Connector_13W3_Pinout.html
So, there are lots of schematics to be found online, but here’s what
works for me… (and this is what that cable looks like)
VGA <-> 13W3
1 – A1 pin
2 – A2 pin
3 – A3 pin
4 – 4
5 – 9
6 – A1 ground
7 – A2 ground
8 – A3 ground
14 – 5
I must say, there’s no Hsync and Vsync in this cable and not every monitor can cope with that… For instance, an old Eizo I have here
complaints about having no sync, while my slightly more modern iiyamas take the signal for granted and display a crisp and clear image…
But when you can get your hands on an Indy with a monitor, it makes life much easier of course :-)

click to enlarge
...my installation-setup for the weekend…
installation of IRIX:
When you first start here up, you see ‘Running Power-on Diagnostics’ then ‘Starting up the system’ with the ability to stop for maintenance. Well, that’s what we’re gonna do. Here you can choose ‘Run Diagnostics’, I’m not sure what that does exactly but it once recovered an videoboard, which was like a little miracle to me. (The board gave a borked signal and once I ran this, everything was fine). Well, the diagnostics are optional, but on a fresh system, it’s what I run… One thing though, it takes hours :-)
After it, you should get a screen like this:
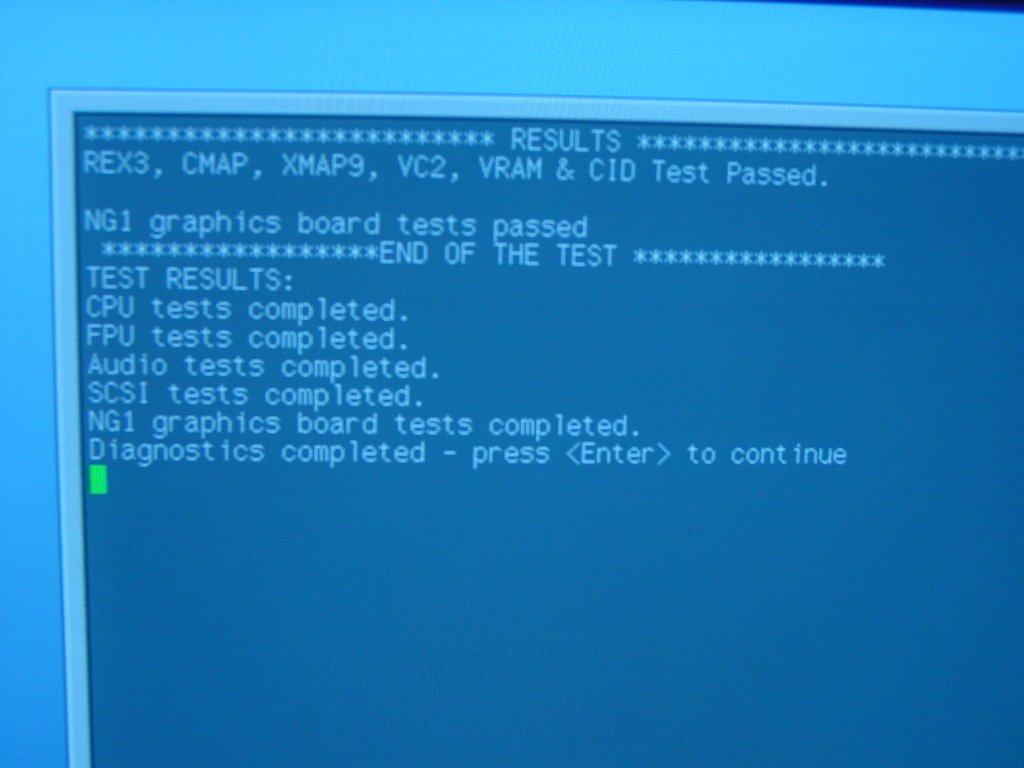
click to enlarge
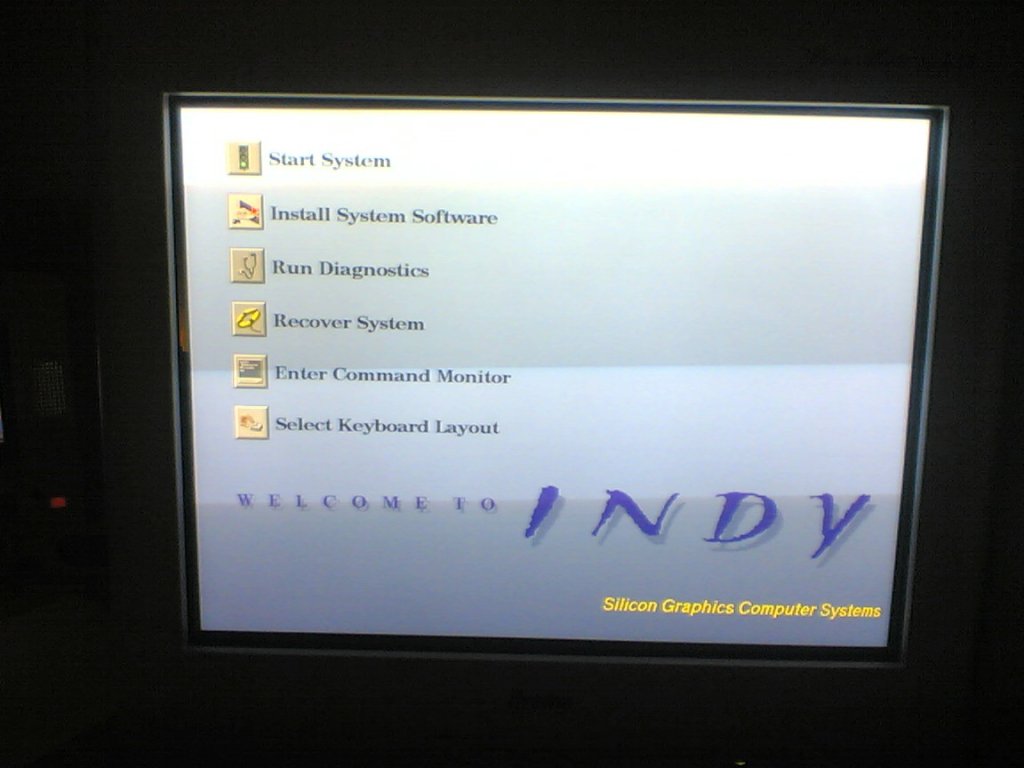
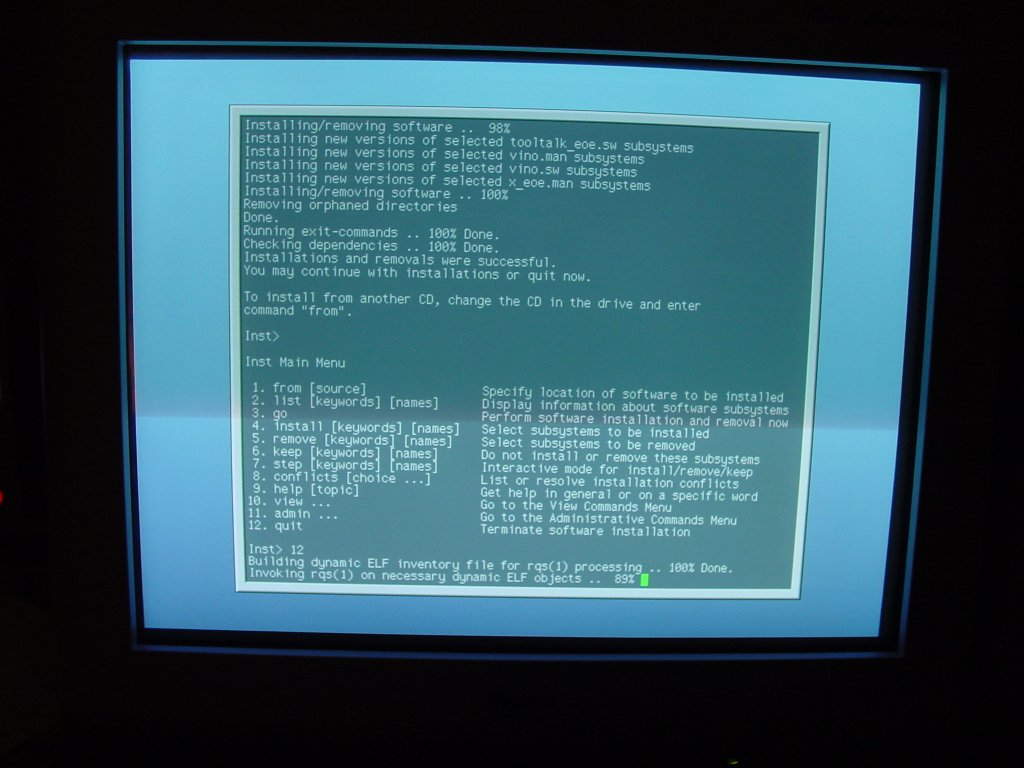
After this you can choose for ‘Install System Software’, choose your media (probably CD-Rom) and choose ‘install’. It will copy the installation tools to disk and after that you get the text-installertool in a nice console-window. First we choose ’11. admin’, I’m not sure in what state your system is, but we’re gonna clean out the harddrive to make sure we have a fresh system. Just choosing ’10. mkfs’ should do the trick, after that we choose ’17. return’. Now we choose ’2. list’ and see if the system chose all the default packages and such. After you made sure it’s got something to install, we check if there are any conflicts by choosing ’8. conflicts’. No conflicts? Nice! Now let’s choose ’3. go’ and let the system install a fresh copy of IRIX to our harddrive.
...some installation-screenshots (most of them made with my phone, hence the crappy quality…)
click to enlarge

click to enlarge

click to enlarge
click to enlarge
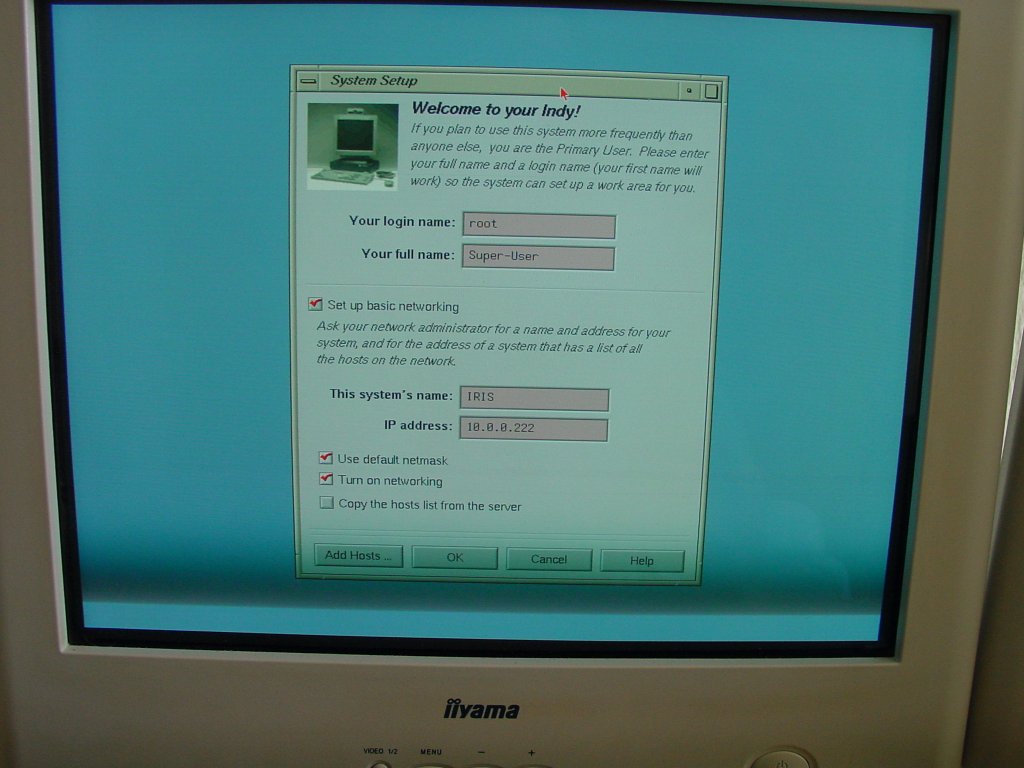
Once the system is installed you can start the system (there’s a ‘Start System’ button in the Maintenance-dialog). After a while you get a login-screen. Here you can choose ‘EZsetup’, only thing we want to do here, is turn on networking. Once we filled in our IP-address and netmask, there’s nothing more we can do here. We need to do the rest of the configuration from the console once we’re booted into the system.
click to enlarge
If this somehow doesn’t work for you, a more extensive installation guide on IRIX 5.3 can be found here
A how-to on how to set up networking on IRIX 5.3 can be Setting up Networking in IRIX 5.3 to 6.5 (and use the instructions for IRIX 5.3 of course).

click to enlarge
One thing I experienced is that the video-daemon wasn’t automatically started anymore at one point, not sure how that happened. Anyways, if your camera all of a sudden won’t work anymore, check on a console and as root which services are automatically started by chkconfig and use chkconfig videod on if necessary.
When you’re booted into your system, you want to play around with the camera of course :-) Just click on the camera-icon on your desktop and tada! you’ll have an image… For adjustments and such to the Indycam, this link is quite extensive.

click to enlarge
click to enlarge
configuration:
So, now we have a freshly installed Indy, connected to the internet, with a camera… Now what?
Well, we need to be able to capture the images of the cam, without any GUI-stuff and we need to schedule it, so it uploads them to somewhere where the whole world can see them…
That’s easier said than done, but here we go:
In my case, my webserver is only accessible by SSH/sftp, so that’s what we’re gonna use. First of all, we need to install SSH on the Indy.
To install, do the follow.
grab a copy of openssh-3.1p1 and libz-1.1.4 tar files.
Then, from a console on your Indy and as root:
cd /usr
mkdir local
(at least, that’s what I had to do)
cd /usr/local
tar xvf /some/dir/openssh-3.1p1-IRIX5.3.tar
mkdir lib
(again, that’s what I had to do)
cd /usr/local/lib
tar xvf /some/dir/libz-1.1.4-IRIX5.3.tar
cd /usr/lib
ln -s /usr/local/lib/libz.so.1.1.4 .
cd /usr/local/
ln -s openssh-3.1p1 openssh
(if your not working on a fresh system and there’s an instance of openssh, you need to remove that by ‘rm -f openssh’)
cd /usr/bin
ln -s /usr/local/openssh/bin/sftp .
ln -s /usr/local/openssh/bin/ssh .
ln -s /usr/local/openssh/bin/ssh-agent .
ln -s /usr/local/openssh/bin/ssh-add .
Now we need to fix the keys.
cd /usr/local/openssh/etc
next we remove the keys
rm *key
rm *key.pub
The key files are as follows.
- ssh version 1 host keys
- ssh version 2 host keys
To generate these keys, you need to issue the following commands.
/usr/local/openssh/bin/ssh-keygen -t rsa1 -f $SSH_INSTALL_DIR/etc/ssh_host_key -N ""
/usr/local/openssh/bin/ssh-keygen -t dsa -f $SSH_INSTALL_DIR/etc/ssh_host_dsa_key -N ""
/usr/local/openssh/bin/ssh-keygen -t rsa -f $SSH_INSTALL_DIR/etc/ssh_host_rsa_key -N ""
above is courtesy of README-openssh-3.1p1
Now you can start sshd, my script can be found here, copy that in a file called sshd in /etc/init.d and then do the following:
chmod 755 /etc/init.d/sshd
ln -s /etc/init.d/sshd /etc/rc2.d/S61sshd
ln -s /etc/init.d/sshd /etc/rc0.d/K26sshd
above is courtesy of irix-build-ssh.php
You can either reboot the system or start sshd by entering
/etc/init.d/sshd start
Now we have a running ssh-daemon, which is nice, but we need to be able to sftp to our webserver and because we need to script that, we don’t want any interactive password-authentication, so, how do we do that? Well, bring in public-key with ssh-agent, there’s some info about that here
We already made the symlinks for ssh-agent, all we have to do is make sure ssh-agent knows the proper rsa-key at startup (I know there are some downpoints to this, but we’re talking a webcam here and if it gets physically stolen (as if…) you can log in to your webserver and remove the key aight?)
...and upload the public rsa-key to our webserver and put it in the file authorized_keys
What I did is change the .login-file for root on the Indy (and about doing this as root… I know too… but again, this is a one-purpose-box… feel free to comment on it if you will)
You can find my .login & .logout scripts here:
.login for root on the Indy
.logout for root on the Indy
Then, we need to upload the public part of the rsa key to our webserver. In my case, I let the Indy logon as ‘markie’ but you could add an extra user if that makes you feel more secure…
Anyways, in my case, I uploaded the key, which is on the Indy at /usr/local/openssh/etc/ssh_host_rsa_key.pub to /home/markie/.ssh/authorized_keys , so you can upload it to [user-dir]/.ssh/ and rename the ssh_host_rsa.pub-file to authorized_keys (if you’re not already have more authorized_keys of course, otherwise you need to add it to the file)
Well, then it depends on configurations on both sides of the line if this’ll work… On the Indy-side I needed to change the (client-side) ssh_config. You can find my file here. And then all is left is the sshd_config on your server.
I’m not gonna inform you how I exactly configured my sshd, but make sure PubkeyAuthentication is set to yes in your sshd_config .
And if you somehow keep having trouble(like I did ^_^) , here’s some more info (I found this link to be the most helpful)
Once that is done we need to make a batchfile for sftp to use, so it can login, put the indycam-picture on your webserver and exit again.
We’re gonna use a shell-script in which sftp is calling a batchfile. On my Indy, these two files are located in the root of the machine…
indycam.sh
sftpbatchfileindycam
Make sure you enter your own info in there ^_^
You can test it out by entering sh /indycam.sh and see if the machine connects correctly and uploads the image… if it does, congratulations! we’re almost there…
Now we need to put all this in a cronjob on the Indy, so it uploads the image on a given interval…
Now the whole crontab-thing on IRIX 5.3 is a little …different… than we’re used to somehow, simply entering crontab -e isn’t gonna work… you can first copy the running crontab of root from /var/spool/cron/crontabs/root to say /rootscrontab
cp /var/spool/cron/crontabs/root /rootscrontab
then you make that writable by changing it in
chmod 755 rootscrontab
Then you can use vi to schedule the shell-script we made earlier by adding:
*	*	*	*	*	sh /indycam.sh
and then unload the current crontab by crontab -r and after it enter crontab rootscrontab and it loads all scheduled events again. (to be honest, I haven’t looked very long into this, but this is what worked for me)
So, now we have a true SGI Indy, taking a pic every minute and uploading it to our webserver, weeeeeee!
As a finishing touch, you can enter, as root, on the Indy:
setenv nogfxkbd 1
setenv ConsoleIn serial(0)
which enables the machine to boot without a keyboard, this works for me, the only thing I need to do is power it on and off… *^_^*
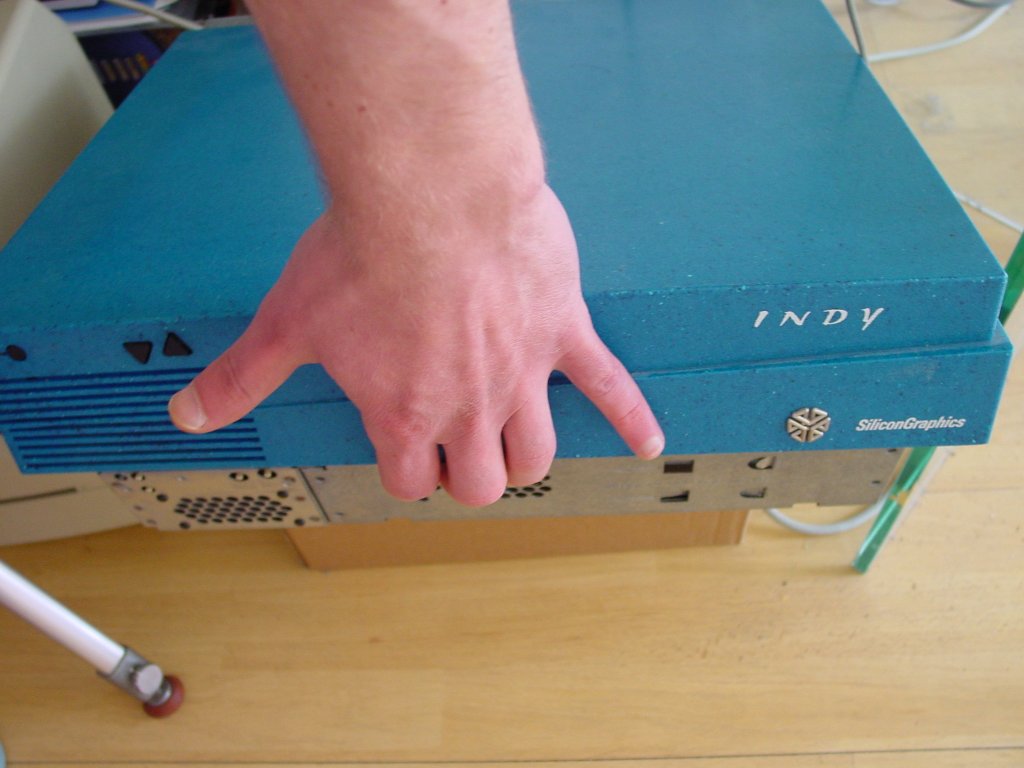
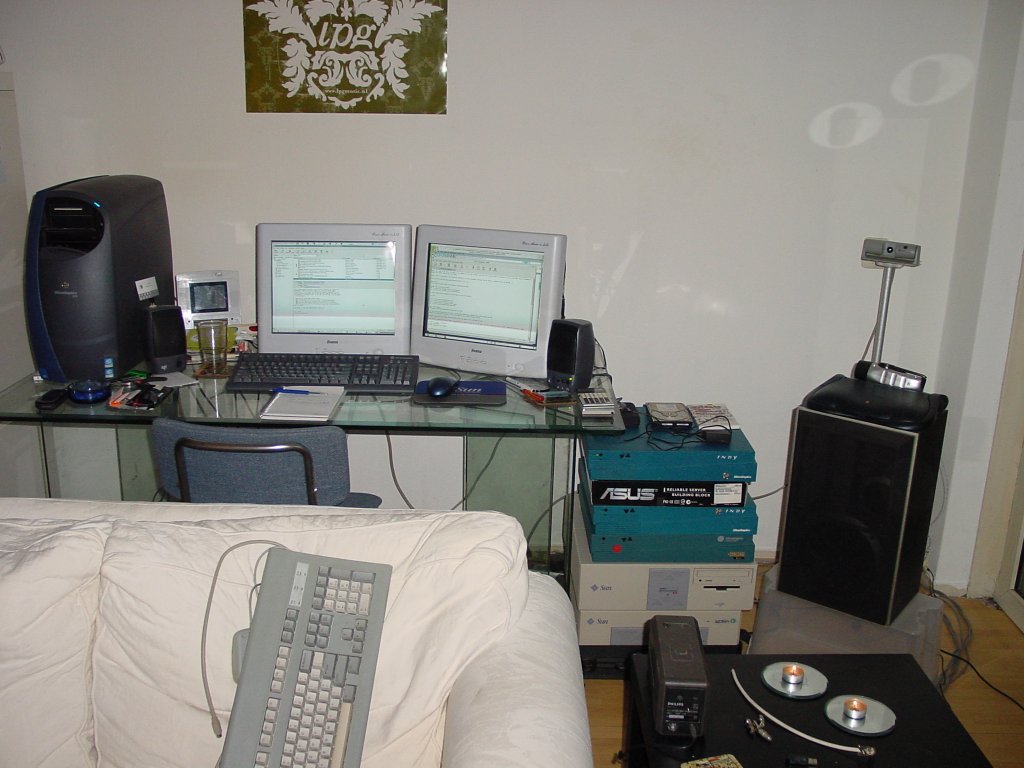
For now, I placed her next to my desk:
click to enlarge
...and the end-result?
click to enlarge
...oh dear… the pics are a little dark… *^_^*
(but it was getting dark when this picture was taken) But hey! you’ll have the 1337357 webcam on the block! a little dark pictures is a small price to pay ey?
But to be a little more honest, I guess a lot of webcams are quite light-insensitive… but luckily you can always go out and scorch yourself an old analog videocamera and connect that to the video-in of the Indy…
UPDATE I connected another cam to the Indy...
Anyways, good luck! (and feel free to comment of course)
...and I’m sure there will be some errors in this How-to…
...if you find any, please mail me at mark[at]geektechnique[dot]org and I’ll correct it…
something else… you can show your SGI-fanboy-ism also by taking off the stickers of the underside of an Indy and put those on your laptop...
DIY trackback
MAKE:
you can find all of my projects overhere


Nice work log!
Mark, I LOVE YOU FOREVER!!!! :Wub:
This is SO going to be done by the end of the week.
Hah, The crappiest cameras ever made! Best to use an external NTSC video camera on these old systems. Nice work.
Hahaha, it’s crappy indeed… way too dark to be useful, I mostly work in the evening/night and I wasn’t planning on turning my room into some filmstudio …so first thing I’m gonna do is go out and buy myself a proper old analog camera…
In the mean time, the current picture can be found here
...I’ll have to make a page around that too…
Haha, reading this remembers me why you are my favourite Unix-g33k!
I guess you don’t have it turned on 24/7 and post the image somewhere, right?
Haha, “favourite unix-g33k”... you’re way too nice ^_^
Anyways, I do have the image uploaded (here ) and I have been testing if it keeps working. Only thing I do is turning it on and also turning it off with the powerbutton (as soon as I press it, it starts a shutdown-process on the box, isn’t that nice?)...
Anyways, I need an analog videocamera because the IndyCam is way too light-insensitive… (I have a Sony Video8, but that one is just as light-insensitive, but ey! it’s a classic! ;-)) and I want to netboot it and integrate it into my stereo as a MP3-player, somehow that seems the neatest idea… no noise, digital out and controlling it by some X-terminal somewhere (my workstation or whatever… oh no! I’ve got a Sun Javastation (Krups) as well! that’s gonna be the X-windowsclient :-))
We’ll see ;-) (I need time!)
I love the use of the INDY cam. congrats on getting everything to work and thanks for the guide. However, i have a suggestion. Since your pics are a little dark, why dont you make your camera an IR (infrared) cam. There are lots of guides online for that (usually just requires removing a little filter right before the ccd and replacing it with a piece of film negative). Then you can make an IR LED array to cast light in your room. The camera would get good footge day and night (might actually be weird during the day due to the suns rays…) and you wouldnt be able to see the light source.
>Then you can make an IR LED array to cast light in your room. The camera would get good footge day and night (might actually be weird during the day due to the suns rays…) and you wouldnt be able to see the light source.
Ha! that’s exactly what I’m working on right now! ;-)
what are indys? email me the answer at matbrunning@hotmail.com plz and thx
Hellow, i have 1 indycam cmnb006c, please help – how me connect cam to CRT TV?? and adjust cam for best video. I have pinout this – 8 digital pin, +12, +5, -12v, SCK, sck serial, Me make DAC??? or please, take a serial clock protocol for this cam if you have this…. and/or phisical OSC for pins….
Thanks.
Just a minor point, but your monitor doesn’t “take the sync signal for granted”, it just happens to support sync-on-green which is what the indy outputs.